Business owners have to face various ordeals when sorting out their receipts. And this procedure consumes a lot of time and effort or results in low efficiency and creates scenarios business owners struggle to work out. However, with the feature of QuickBooks enterprise, you will no longer find it necessary to sort your receipts manually as the automated feature will classify and collect sort receipts properly in a short period.
Further, the receipt management features ensure you can import receipt pictures through your app or upload the content directly to QuickBooks. And this automated process will make you manage your receipt correctly. In this article, we have come up to discuss the process to upload receipts to QuickBooks desktop pro, premier, and enterprise solutions. So, keep reading on!
1. You can set up Receipt management on your Desktop
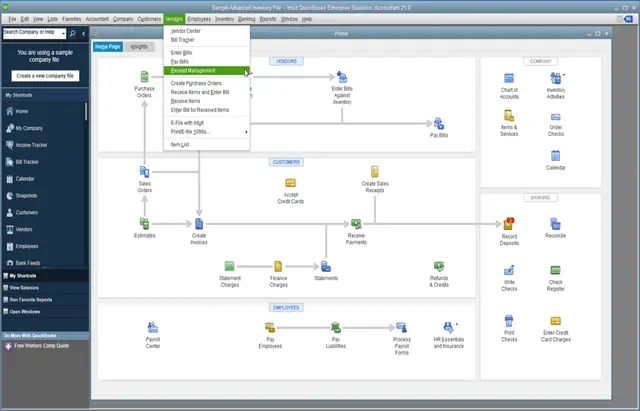
One of QuickBooks enterprise receipt management features is setting up receipt management on your desktop or phone. It would be best to have an intuit account link with the company file whose receipts you are uploading. Business owners can upload tickets from their mobile devices, which is essential. Furthermore, to access the Receipt Management feature from your desktop, you must have to follow the steps mentioned below:
- Choose “vendor” on your menu
- Then choose Receipt Management

- If you are logged into your intuit account, choose the company file
- If you have different customers, select “manage user” under receipt management.
At this time, you have activated receipt management for your desktop.

2. You can Use Your Mobile Device
Another feature of QuickBooks Enterprise for Receipt management is that you can upload receipts through mobile devices. The best thing is that the QuickBooks enterprise mobile version is available for IOS and Android.
QuickBooks For IOS:
At this point, you must have to install the app on the Apple app store and install it on your device. To upload your receipts, use your IOS device to sign in, select the company file you wish to upload the receipt to, and press “continues” -where you can click on the camera icon to take a image of your receipt. Lastly, you can add a name and memo to upload the photo.
QuickBooks For Android:
Download and install your QuickBooks Desktop on the google play store. Once you have downloaded the app on your android device, here are the steps to use QuickBooks on your android. Tap Receipt Snap on your device- click on capture receipt- upload receipt – Add name and memo- ok.
3. Process Receipts Using QuickBooks Desktop
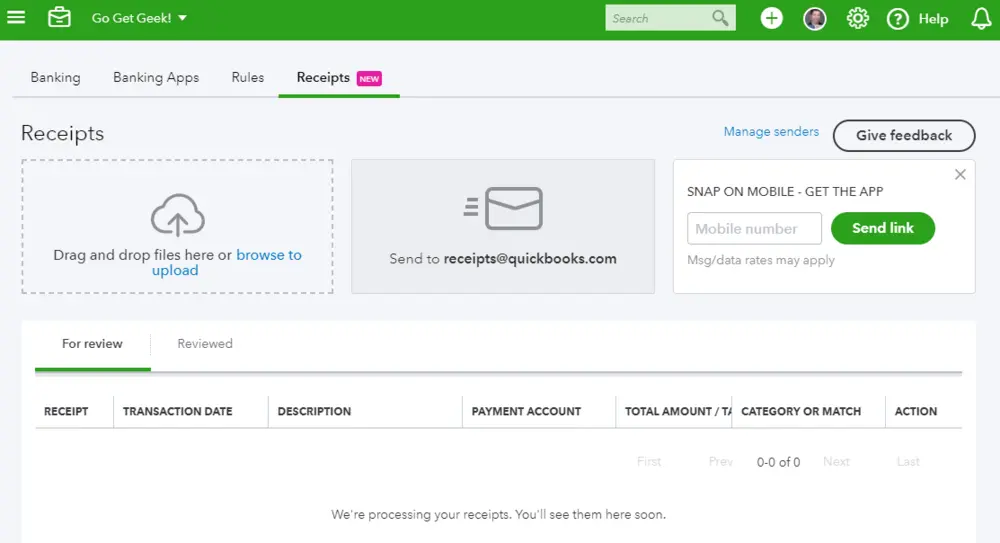
You can Process your receipts with QuickBooks desktop. You can apply this feature through the following steps:
- Choose the Vendors
- Choose Receipt Management
- Under ”for Revie”, you can review the extracted information
QuickBooks Receipt uses an automated process to extract information like the vendor’s name, bank details, and transaction date if you have followed these steps. You can also edit individual receipts or execute batch actions depending on the type of data you extract. The features are as follows,
- You have access to ‘edit vendors’ names, accounts, bank details, and amounts for both individual and multiple deals.
- You can now delete the transactions, whether the transaction is individual or multiple.
- You can upload your receipts either individually or in batches. After that, you can pay bills and assign permits to both individual and batch processes.
4. Attach Digital Receipt Image
Another Absolute feature of QuickBooks for Receipt management is that you can attach your Digital Receipt Image to expenses to form an automated matching. This process releases the stress of manually entering your receipts and piecing the matching expense transactions into them.
You have to do is sync your receipt image; then, QuickBooks Receipt Management will automatically pull out the matching expense from your saved company contacts. This feature will protect business owners from the unnecessary burden and time taken by manual processes and collect accurate information for audit trials.
5. Manage Multiple Receipts at Once
The goal of QuickBooks is to improve the company’s efficiency in managing its books. The QuickBooks Receipt Management does that; it improves efficiency by making business owners collect, classify and sort multiple receipts in one sitting. The automated receipt sorting process eventually contains the tokens and categorizes and reviews them, ensuring who can manage the bulk receipts accordingly.
Conclusion
When it comes to the management of the receipts, the QuickBooks Enterprise brings a whole new difference to the table, which gives business owners access to handle the receipt management process efficiently. Also, it guarantees the automated process that efficiently collects or sorts out receipts in recorded time by giving business owners a database to match their transactions.
Above in this blog, we have mentioned the upload receipts to QuickBooks desktop, where we have shared all the processes and features for receipt management. We hope the above reading might be helpful for you and gives you an appropriate solution. Still, if you face any difficulty, then don’t hesitate to contact our QuickBooks desktop support team of professionals via dedicated support line 1-800-615-2347.


![To Increase YouTube Subscribers Must Use These Service Provider [New]](https://businessleed.com/wp-content/uploads/2022/11/To-Increase-YouTube-Subscribers-Must-Use-These-Service-Provider-New-360x180.jpg)


